系統環境:Centos 5.2
1.安裝yum-fastestmirror
.[root@localhost ~]# yum install yum-fastestmirror
Setting up Install Process
...
Running Transaction
Installing: yum-fastestmirror
######################### [1/1]
Installed: yum-fastestmirror.noarch 0:1.1.9-2.fc8
Complete!
2.
安裝Repository RPMs
[root@localhost ~]# rpm -Uvh
http://yum.opennms.org/repofiles/opennms-repo-stable-rhel5.noarch.rpm
查詢可安裝的套件
[root@localhost ~]# yum list opennms
…….
Available Packages
opennms.noarch 1.6.1-1 opennms-stable-c
3.
安裝postgresql-server
[root@localhost ~]# yum -y install postgresql-server
……
Transaction Test Succeeded
Running Transaction
Installing: postgresql
######################### [1/2]
Installing: postgresql-server
######################### [2/2]
Installed: postgresql-server.i386 0:8.1.11-1.el5_1.1
Dependency Installed: postgresql.i386 0:8.1.11-1.el5_1.1
Complete!
4.
啟動postgresql
並設定開機時啟動。
[root@localhost ~]# service postgresql start
Initializing database:[OK]
Starting postgresql service:[OK]
[root@localhost ~]# chkconfig postgresql on
5. Install OpenNMS
=============================================================================
Package
Arch
Version
Repository
Size
=============================================================================
Installing:
opennms noarch 1.6.1-1
opennms-stable-common 4.9 k
Installing for dependencies:
jdk i586 2000:1.5.0_15-fcs
opennms-stable-common 46 M
jicmp i386 1.0.7-1
opennms-stable-rhel5 46 k
opennms-core noarch 1.6.1-1
opennms-stable-common 49 M
opennms-webapp-jetty noarch 1.6.1-1
opennms-stable-common 30 M
Transaction Summary
=============================================================================
Install
5 Package(s)
Update
0 Package(s)
Remove
0 Package(s)
Total download size: 126 M
Is this ok [y/N]: y
Downloading Packages:
(1/5): opennms-core-1.6.1 100% |=========================| 49 MB 03:30
(2/5): opennms-webapp-jet 100% |=========================| 30 MB 01:36
(3/5): jdk-1_5_0_15-linux 100% |=========================| 46 MB 03:02
(4/5): opennms-1.6.1-1.no 100% |=========================| 4.9 kB 00:00
(5/5): jicmp-1.0.7-1.i386 100% |=========================| 46 kB 00:00
warning: rpmts_HdrFromFdno: Header V3 DSA signature: NOKEY, key ID 4c4cbbd9
Importing GPG key 0x4C4CBBD9 "OpenNMS Project (A Key for Signing OpenNMS RPMs) " from
http://yum.opennms.org/OPENNMS-GPG-KEY
6.將
/etc/yum.repos.d/opennms*.repo檔案加入以下的參數
enabled=0
7. Configure OpenNMS
[root@localhost ~]#
export OPENNMS_HOME=/opt/opennms
8. Configure Database
pg_hba.conf
與 postgresql.conf
在 /var/lib/pgsql/data
下
[root@localhost ~]# vi /var/lib/pgsql/data/ pg_hba.conf
原有的參數設定
local all all ident sameuser
host all all 127.0.0.1/32 ident sameuser
host all all ::1/128 ident sameuser
改成
local all all trust
host all all 127.0.0.1/32 trust
host all all ::1/128 trust
[root@localhost ~]# vi /var/lib/pgsql/data/ postgresql.conf
#
去除 "*"
如下
listen_addresses = 'localhost'
9.
重新啟動services
並建立Database
[root@localhost ~]# service postgresql restart
[root@localhost ~]# sudo -u postgres createdb -U postgres -E UNICODE opennms
10.
安裝iplike
[root@localhost ~]# yum install iplike
[root@localhost ~]# install_iplike.sh
CREATE FUNCTION
11.
設定OpenNMS
連結到 Java
[root@localhost ~]# $OPENNMS_HOME/bin/runjava –s
12.
加入JAVA_HOME
到 /etc/default/opennms
[root@localhost ~]# vi /etc/default/opennms
JAVA_HOME=/usr
13.
初始化OpenNMS
與 Database(請注意您的系統是32bit或64bit之作業系統)
# i386 example
$OPENNMS_HOME/bin/install -dis -l /usr/lib/jni:/usr/lib
# x86_64 example
$OPENNMS_HOME/bin/install -dis -l /usr/lib64/jni:/usr/lib64
…………..
Installer completed successfully!
表示成功了。
14.
編輯$OPENNMS_HOME/etc/discovery-configuration.xml
,設定所要監看的IP
區間

15.
啟動opennms
的service
,並設定開機時啟動
[root@localhost ~]# service opennms start
[root@localhost ~]# chkconifg opennms on
16.
由瀏覽器連線到SERVER
看結果
http://ServerIP:8980/opennms/
初始帳號密碼:admin/admin

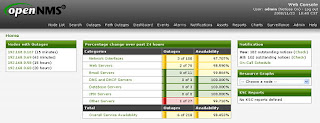
17.
在opennms
運行一段時間後,就可以看到下列的訊息。
<div style="display:none;"><a href="https://seninlinkin.com">Ziyaret Et</a></div>

